Manual photography
At first, the manual photography mode is what gives the photographer the greatest freedom of command, making all the changes to the camera settings according to each type of scene. It's a completely custom way of working, although it does offer some adjustments like white balance and ISO in smart or auto mode.
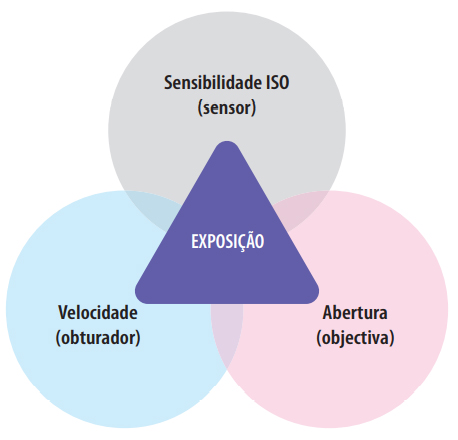
Adjustment of the exposure triangle is carried out on three pillars: aperture, shutter speed and ISO sensitivity. For this adjustment to work properly, the most important step is to measure the lighting of the scene, through the photometer (internal or external to the camera). From the measurement of light quantity and temperature, you will make the other necessary adjustments. Before starting these adjustments, it is very important to assimilate an important point for the production of an image balanced in its colors and temperature: the white balance.
| White Balance |
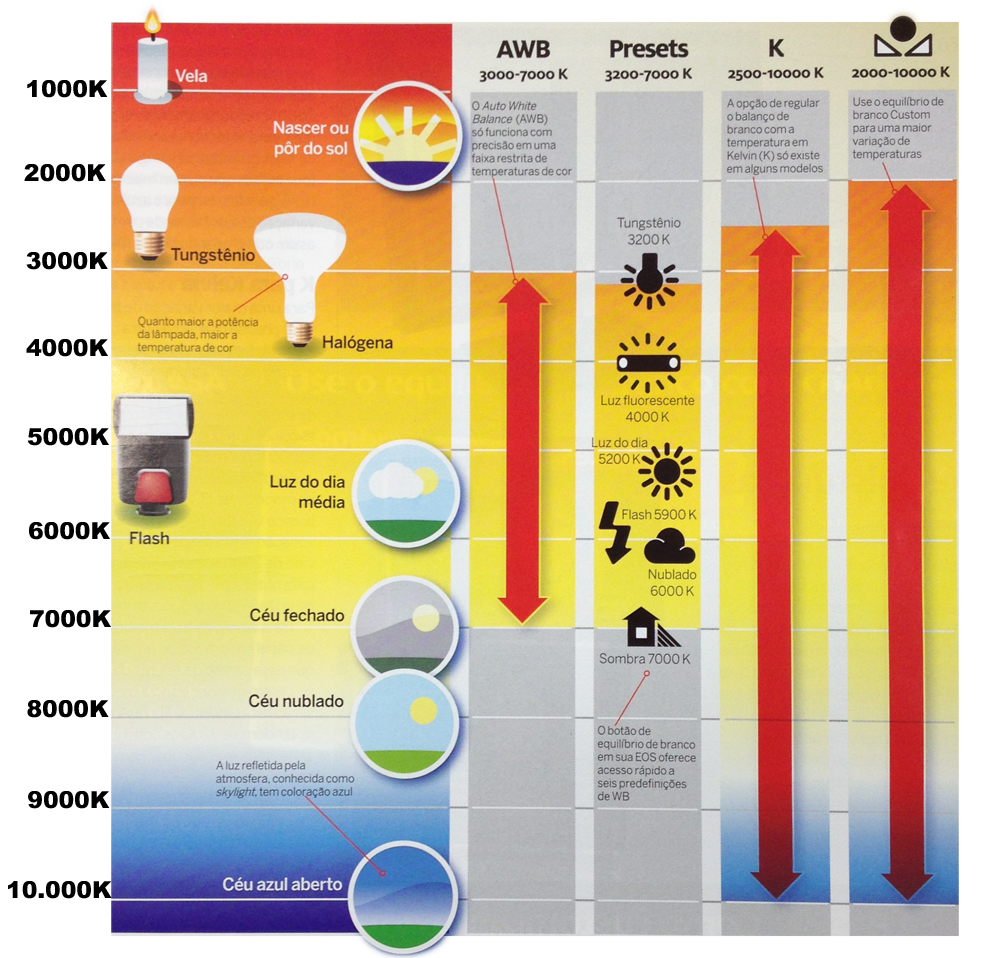
At the beginning of this topic on Photographic Technique, you understood that light has colors and also a temperature, alternating between warm and cold tones, measured in Kelvin scale.
When photographing a subject, the camera will read the type of local lighting and neutralize the colored areas with the predetermined lights.
Unlike the human eye, digital camera sensors have difficulty recognizing the white in the image, requiring some adjustments to be made for this. These adjustments are called White Balance. To correctly adjust the white of an image, we must take into account factors such as the light source and temperature. As selected, the image may have bluish, greenish or orange tones in the photograph.
| Balancing Scene Colors|
White balance has the role of balancing the colors of the scene according to the type of lighting received, more orange and warm (like tungsten lamps) or more bluish and colder, (like fluorescent lamps). There are also other options (called presets) such as daylight, cloudy, shadow and flash usage.
So, in short, white balance or white balance is adjusting the color temperature of the main light so that whites and neutrals are as the photographer wants them.
It is also possible to operate in automatic mode, however, the balance suggested by the camera is not always suitable for all types of scenes, it is preferable for the photographer to be able to test the type of result he wants. According to the model of your equipment and the options offered by it, it is possible to adjust the white balance, manually, choosing the temperature you want to work with, as shown in the example in the image below.
The final result will depend on what you, the photographer, consider as pleasant, interesting and balanced.
preset: is a set of settings that is applied to the photograph equally, that is, it is a preset that applies to the situation of the photograph without making any particular adjustments to it. The preset is just a quick, standardized overlay of settings. In general, it is necessary to make later corrections, specific to each image.
| Exposure triangle adjustments in manual mode |
Remember the exposure triangle to start understanding the adjustment in manual mode:
| With regard to speed |
Photographing inexperienced models is a task that requires attention. Because most of the time, they can't stay frozen so you can operate the camera at reduced speed. Also, to produce candid shots, it's less practical to carry your gear on a tripod. That's why many photographers choose to keep the camera steady in their hands and work at higher speeds. This minimizes the risk of juddering or spontaneous movements of the models that can be lost during low-speed shooting. Keep in mind that speeds above 1/250 sec. in good light conditions, they are capable of freezing the natural movements of a human being.
| With regard to opening |
The idea of portrait photography, in general, is to isolate the model from the background, making it stand out in the scene. The use of a large aperture helps, since, in addition to gaining greater light input, it is possible to differentiate the planes, giving the blurred effect. However, precisely because of the shortened depth of field, the risk of losing important information during the production of close-ups is quite high.
| Regarding ISO |
Portrait photography reveals very deep details especially the highlight on the human face. The color and texture of the skin, the sharpness in the hair strands and the shine in the eyes are generally worth mentioning. With the ISO value on the rise, there is a risk of graininess if you choose too high an ISO. So choose wisely.
| Practice|
Now, you need to put your equipment to use and experience all the shooting modes offered by your camera. Because, only then, will you be able to understand how the results change to a greater or lesser quality in each situation. It's also worthwhile to produce images in the harshest natural lighting conditions and experience the ISO quality offered by your camera.
Anyway, we will meet in the next article on photographic technique.
So, you liked the article about Manual photography and want to contribute with a coffee of thanks? Make your contribution using the QR Code below. Help the Foto Blog that helps you. Any value is welcome! A coffee is R$2 here, for example.

Related articles
| | Make long exposure | | Types of cameras | | Light the principle (part 1) | | Light the principle (part 2) | |
Other links
| | Photo Accessories | | Manual Photography | | Photography | | Online Gallery | | FotoBlog | | Photometry | | Photographic Technique || Color Photographic Technique | | Quality of a photo | | What is Photography? | | The Role of the Sensor | | Pricing | | Diaphragm Exposure Triangle | | Lens Types | |