Flash | Diffuse Light | Direct Light | Introduction
If you read the previous articles so far, you already know how the equipment behaves during light absorption by the sensor and knows a range of camera options and their qualifications. It is also able to understand the operation of these equipments in different modes of photography, the control of the exposure triangle. Therefore, you are prepared for a new step, understanding and taking photos with unnatural (artificial) lighting.
From this article on, you will understand the reasons for using auxiliary lighting as well as the main differences between the internal flash, the camera itself (built-in or pop up), as well as the external flash (dedicated or portable).
While studying, at each stage, always have your equipment in hand and test the most diverse configurations, as this will be of fundamental help while assimilating the theoretical part.
The introductory understanding of auxiliary lighting will bring preparation and security to test new possibilities in the face of different exposure situations in your photography.
Photographing is building images by understanding the light reflected by subjects. Not only technique, but also curiosity and daring are essential to build unique images.
What is flash and what are the main types?
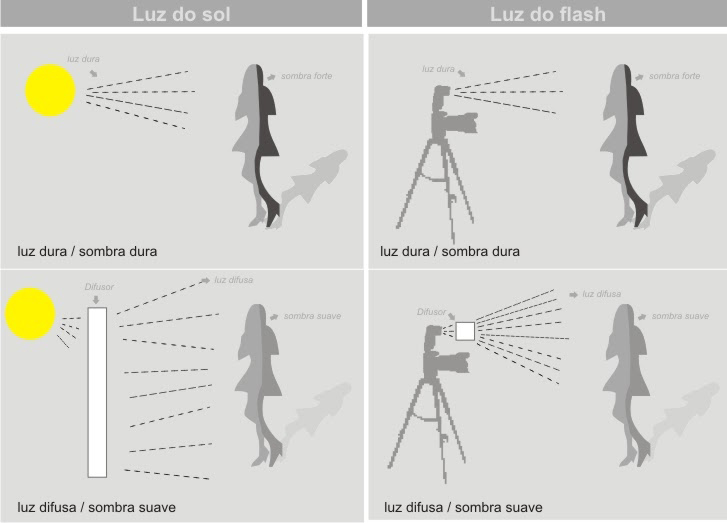
The flash is an unnatural auxiliary lighting feature, such as sunlight or moonlight, and acts as a compensator for insufficient ambient light or a builder of shadow effects, whether the scene is outdoors or indoors.
Our perception of the world is through the senses. Among which, vision, supported by the action of light, is primarily responsible for revealing the three-dimensional nature of reality.
three-dimensionality
The environment in which we live is not flat, but endowed with measures, depth, extension. None of this exists in a photograph. What we have there is a two-dimensional cutout of what's out there. However, when looking at a photo, we get the distinct impression of the three-dimensionality of the things printed on that flat piece of paper (or, more common nowadays, on the flat screen of a computer). That's because, while sophisticated, the gaze (and therefore the brain) can be tricked with a few tricks, such as perspective (the apparent convergence of parallel lines on the horizon), scale (equally sized objects that appear to have different dimensions according to the distance from each other), the overlap and atmospheric perspective (the use of blur and cool colors to indicate distant objects).
However, the most convincing result is obtained by using the binomial light-dark – the tonal difference caused by the gradation of light on objects. Choosing the direction of light in order to create shadows, we guarantee a game of light and dark that allows us to perceive the volume of objects and the depth of spaces. It's important to highlight
that the greater the tonal variation – diversity of light and dark tones present in a scene – the better the sensation of three-dimensionality in the image, as the brain will have more information to perceive, process and interpret the effects of depth and volume.
light intensity
The light fired by the flash is very fast and pulsates at a speed of approximately 1/900 seconds. This light will lose its intensity as it travels through the medium to reach its destination, so from the moment it is fired, the flash light tends to be less intense for subjects further away from the shooting's starting point.
After choosing one of the photography modes (automatic, semi-automatic or manual), the light in the environment will be measured using the photometer (external or built-in camera). If, after varying and testing all the combination possibilities in the exposure triangle, the metering still doesn't find a balance for the capture, it's time to turn on the flash. This aid is also purposefully used to balance different light situations, such as the shadow that is projected when the subject is facing away from the light source.
remembering
So, you already understand that to regulate the light entering your equipment you can:
- Use large openings, allowing more light to enter;
- Reduce speed, exposing the camera sensor longer;
- Raise the ISO, increasing the sensor's sensitivity to ambient light.
If after testing these settings, it is not possible to take a picture of acceptable quality, then using flash is likely a possible solution.
Keep in mind that you won't always have a large aperture lens with f/1.4 or f/2 numbers. Or, your objective may already be operating at the diaphragm's efficiency limit. There will be times when it will not be possible to work at very low speeds, due to the risk of shaking or people moving constantly. And more: you will not always be able to work with very high ISO, to the point of losing the photo due to the high noise index.
Therefore, in addition to compensating for the lack of adequate local lighting, flash is also used creatively. In other words, it allows you to create effects in your photos, such as directed shadows, attractive, dramatic, dissolved, highlights, among other interesting possibilities.
expendable
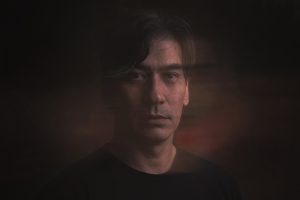
The use of flash is unnecessary and even unnecessary in outdoor and sunny environments. Unless the subject to be photographed is backlit and must appear in the photo. Otherwise, photographs taken on purpose in the light of sunset or silhouette do not need a flash. See an example in the photo below.

The sun covered by clouds, causing medium/low intensity lighting, allowed the camera lens to be pointed directly at the sun (where I took the photometry). In a moment of full light, with intense sun, this practice is not recommended to preserve the sensor.
To use these effects to your advantage, it is important that you try out the possibilities offered by your equipment. Know how it behaves in different light situations, because, at each intensity and direction of the shot, there will be a different result of shadows.
CONTINUED IN NEXT ARTICLE
Anyway, we will meet in the next article on photographic technique.
So, did you like the article and want to contribute a coffee of thanks? Make your contribution through the QR Code below. Help the Foto Blog that helps you. Any value is welcome! A coffee is R$2 here, for example.
Related articles
| | Make long exposure | | Types of cameras | | Light the principle (part 1) | | Light the principle (part 2) | |
Other links
| | Photo Accessories | | Manual Photography | | Photography | | Online Gallery | | FotoBlog | | Photometry | | Photographic Technique || Color Photographic Technique | | Quality of a photo | | What is Photography? | | The Role of the Sensor | | Pricing | | Diaphragm Exposure Triangle | | Lens Types | |